3- How To Post A Fledge Watch Report
Posting Reports on the FalconWatch Blog
The FalconWatch blog uses WordPress, a very popular software program for writing blogs. WordPress blogs are powerful and easy to use. You’ll find writing your Fledge Watch report to be no more difficult than typing an email.
After logging on to the Falcon Watch blog, you will see the blog’s Dashboard, the place where all of the data in the blog is organized. Here are the steps you need to take.
Logging In
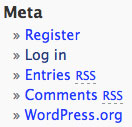
 Log in by clicking the Log in link under the Meta section on the right side of the blog. You may need to scroll down a bit to find it. You can also go straight to the FalconWatch blog login screen at http://rfalconcam.com/falconwatching/wp-admin.
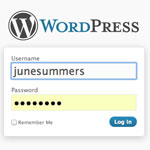
You should now be presented with the login screen for the FalconWatch blog. It should say “WordPress” at the top, and look similar to the screen shown at the right. Type your Username and Password in the spaces provided, then click the Log in button:
 Your username and password need to be entered exactly as they were when you registered. (Your password should have been emailed to you immediately after you registered.)
If you lose your password, there is an automatic password reset function on the blog. Just click on the Lost your password? link at the bottom of the login screen and enter your E-mail address. It must be the same address you registered with. An E-mail message will be sent to you. In it will be a link to reset your password.
Updating Your Profile
![]() Each user has a profile. Your profile contains information about you such as your name, your email address, and details about how your information should be presented on the blog. To get to your profile screen, click the Profile link on the upper right side of the screen after you log in.
Each user has a profile. Your profile contains information about you such as your name, your email address, and details about how your information should be presented on the blog. To get to your profile screen, click the Profile link on the upper right side of the screen after you log in.
In addition to changing your personal information, you can create a new password for yourself here. Scroll down to the bottom of the profile page to find the New Password section.
You’ll need to type your new password in each of the text boxes. The gray box at the bottom will tell you if your chosen password is too short, and how “strong” or secure your password is.
After you have updated your profile, be sure to click the Update Profile button at the bottom left side of the screen.
Writing a Post
After you log in to the FalconWatch blog you’ll be taken to the “Dashboard” screen. Click the New Post button in the dark gray bar near the top of the page:
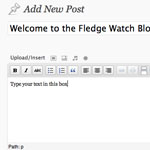
 The Add New Post screen will open. It is very similar to most email programs, with a space for you to type the title of your post, and a large box into which you can type the body of your post. Buttons along the top of the text entry box allow you to format your text, insert links to other websites, images or other media, and perform other formatting functions. Place your mouse cursor over each button to see a description of its function. For most of the formatting buttons, highlight the text you want to format, then click the button. For instance, if you want to place a word in bold text, highlight the word, then click the
 ![]() button.
button.
When creating a title, make sure you include the date and time of your fledge watch shift. You may also include your name and a short headline for your post, but try to keep it brief so that the title doesn’t wrap onto a second line. Here’s an example:
June Summers- Monday, June 16, 3-6PM
Before you begin writing your post, be sure to assign it a category. Click on the Fledge Watch check box on the right side of the page under Categories.
When you write your post, refer to the Guidelines for Posting. Be sure to include all of the pertinent information about what happened during your post. Avoid unnecessary speculation, and write clearly. Use the spell check button and proofread your report before you post it. At any time while you’re writing your post you can see how it will look on the blog by clicking the Preview button on the right side of the screen. A new window will open displaying the contents of your post formatted as it will appear when it is published. This is a good way to check your work.
If you use your own blog to write your watch reports, just include a link to your blog or website in the body of your post on the FalconWatch blog. Check out the section below for more information on including links in your posts.
If you’re writing a lengthy report it’s a good idea to save your work occasionally. That way if you lose your internet connection or some other calamity occurs you won’t lose your masterpiece! Click the Save Draft button on the right side of the page at any time while you’re composing your report. By the way, the blog will actually save your work automatically every few minutes, so it’s not absolutely necessary for you to save the work yourself, but it’s a good idea anyway.
Saving your post allows you to come back to it later. The next time you log in to the FalconWatch blog you’ll see a link for your drafts if you have any unpublished posts. Just click the draft link to open a list of the drafts you’ve created. Then click the one you want to continue working on.
After you’ve written, proofed, spell-checked, and categorized your post, you’re ready to publish it. To do that, just click the Publish button on the right side of the screen (Hint: It’s next to the Save Draft button we just talked about). Publishing your blog post saves your work and adds it to the blog.
Publishing Posts in the Right Sequence
Posts are presented on the blog in reverse chronological order. That means the most recently published post always appears at the top of the blog, with older posts appearing below that. If there’s a long delay between the time of your Fledge Watch shift and the time you’re writing your report, your post may get published to the blog in the wrong order.
To avoid this problem, you can edit the time that the blog thinks you’ve published your report. In the Publish Status section on the right side of the screen, click the small Edit link next to the picture of the tiny calendar. That will open some new text boxes where you can change the time and even the date assigned to the post.
A good rule of thumb is to set the time to about an hour after the end of your Fledge Watch shift. Also, be sure to make the date agree with the actual day of your fledge watch! Setting the correct date and time for your watch report will ensure that our readers get an accurate account of all the fledging activity, in the order that it happened.
Adding Pictures, Videos and Other Media Files
Our viewers love to see the falcons! If you’ve taken pictures, you can add them to your watch report by using the Upload/Insert links located just above the toolbar buttons:
Clicking one of these icons will allow you to upload (store) images or other files to the FalconWatch blog. Hover over the icon with your mouse cursor to see what each icon does.
NOTE: There is the capability to share video files, but due to space restrictions on our servers, we prefer that you upload your videos to one of the free hosted services such as YouTube, then include a link to your video in your fledge watch blog entry.
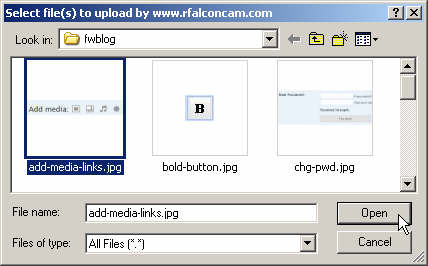
After clicking an icon, locate the file you want to upload on your computer’s hard disk by clicking the Select Files button in the window that appears. Another window will open, allowing you to search your computer’s hard disk for the file or files you want to upload.
You can upload a single file by selecting it. If you want to upload several files, hold down the Ctrl key while you click each file you want to upload. When you’re done selecting files, click the Open button:
The FalconWatch blog will add your selected file(s) to its file Gallery. If you’ve only uploaded one file, you’ll be presented with options for adding the file to your post immediately. If you’ve uploaded several files you’ll see a list of all of them. Click the Show link to the right of the file you want to insert into your post.
There are a variety of options for inserting your image or other file into your post. Most of the options control how the image is displayed in relation to the text in your report, as well as the size of the image.
In terms of size, we recommend choosing Thumbnail or Medium. Thumbnails are small versions of an image or file. Clicking the thumbnail opens the full-sized image, or activates the file (in the case of a video or other embedded media). A Medium image is limited to 450 pixels wide– a width that will display correctly on the published blog page. If you insert a full-sized image, it may flow outside the blog’s borders. It may also be hard to for viewers with slower internet connections to read your post. Avoid those problems (and save us having to edit your post) by choosing Thumbnail or Medium.
You can choose to align your images along the left or right sides of the screen so that your text wraps around the image, or dead center in the middle of the line, with text surrounding the image on both sides. You should only choose to align an image if you’re inserting a Thumbnail. Otherwise, choose None for the alignment.
When you’ve finished choosing your options, click the Insert into Post button. Feel free to experiment with different alignments, sizes and other options. You can move your inserted image or file around by clicking on it and dragging it to the desired point within your post. Normally the image should be inserted at the position of your text cursor, but sometimes it may be inserted at the top of the post. If that happens, just click and drag it where you want it to be.
If you don’t like how the image turned out, just click it with your mouse then press the Delete key on your keyboard to get rid of it. Then follow the steps above to add the file again, choosing different options this time around. Again, feel free to experiment. After a bit of practice you’ll learn the ins and outs of posting images and media files.
A note about videos and other media files: Please don’t upload files larger than 2 Megabytes). Video files should be compressed for viewing over the web wherever possible. Note that videos taken straight from your camera often have little or no compression, and can be very large. There are a variety of free or low-cost video converter programs available online. You should also consider uploading your video to a video hosting site like YouTube, and then adding a link to the video into your report.
Adding Links to Other Websites
Adding links is easy. You can just paste in the website address, or use the ![]() button to insert a link. To use this button, highlight the text you want to use to identify your link, then click the button. Paste the website address into the Link URL field, then click the Insert button:
button to insert a link. To use this button, highlight the text you want to use to identify your link, then click the button. Paste the website address into the Link URL field, then click the Insert button:
It will make a link that looks like this, with the text you highlighted underlined and colored blue. When your blog post is published, it will be a clickable link that will take the reader to whatever website you specified.
Logging Out
When you’re finished working in the blog, you should log out. This is a security measure that will prevent unauthorized postings using your account. It can also help protect against hackers or other kinds of cyber attacks. Click the Log Out link at the top right side of the post writing screen, or the Log Out link in the Meta section on the FalconWatch blog screen.
Where to Get Help
You can click the Help link at the upper right corner of the screen to get assistance for using the FalconWatch blog. If you have a question about using the blog that isn’t addressed in the Help screens, send an email to jess@rfalconcam.com.


